Tuesday, October 25, 2016

Series Painting #6: In Progress

I begin yet again with a loose projected sketch.


  I add the darkest values first and emphasize important shapes in the face.
Next I paint in middle values and then highlights. I do this quickly and loosely.

I start painting in the body so that those shapes will inform my approach to the head and bring the figure together. I realize that the torso is a little too big compared to the source photo. 

I thin out the torso and reshape the head accordingly. Layers of gel medium increase the saturation of paint in the face and allow me to smooth out details.  

I continue to add subjective color and focus on the shapes That make up the figure.
 With Wayne Thiebaud in mind, I thicken up the paint aground the figure a little more and it a colorful line around the edges of shadows. I will continue to refine this painting and clean up all edges. the white space surrounding the figure will be thickened up drastically to match my previous entries in the series.


Series Painting #5: In Progress

I start with the loose projected sketch.


I begin painting by putting down the shadow areas.

The darkest values are added And act as guidelines for future shapes in the face.

Middle values and highlights are put in quickly. The volume of hair surrounding the face is painted in, also very loosely.

I shift attention to painting in the lines that will connect this portion of the couch with that shown in my second painting for the series. This transgender woman will be sitting across from the man wearing the cowbell shirt. I measure the shapes for the couch accordingly and start painting in more of the figure's body.

At this point in the painting. I slow down and begin to really focus on fine-tuning the face for the best likeness. I add texture to the white background surrounding the figure and attempt to color match this half of the couch with the other half in my previous painting. More subjective color is added and I pay more attention to edges. I will continue to work on this painting, bringing out more detail in the arm tattoo and cleaning up the overall composition.

Thursday, September 29, 2016

Series Painting #4: In Progress

I begin my fourth painting in the series with a projected sketch. This is a very simple outline I will build off of using the source photo as reference.

I begin to lay down some paint loosely. In this stage I get a feel for basic shapes, shadows, and highlights in the face.

I continue the same process as above. I refine the details with much closer attention from this point.

I lay down paint for the chair and other parts of the body. This is all very quick and loose. I will add  the tattoos next.

When referring back to the photo, I notice how much I have to subtract a lot from the loose rendering of the face thus far. I refine the details of the face with careful attention. Now that I've started to refine the face and tattoos, I start to pay more attention to the thickness of paint surrounding my figure. I build that thickness using the gel medium and modeling paste I discussed in my technical study. After these layers of gel and paste dry, I apply more white paint around the figure to eliminate that yellowing.

I continue to increase the detail and subjective color in this painting. I will keep working on this piece as I begin my next in the series.

Saturday, September 24, 2016

~Technical Studies - Wayne Thiebaud's Technique and Approach

For my technical study, I chose to look to the inspiration for my series: Wayne Thiebaud. His background as a cartoonist adds some very fun and interesting influences to his paintings that bring them more life. That's why I wanted to paint the subjects of my series in a similar style. Artistically, I an drawn to his subjective use of color and his approach to art that is both child-like and professional. But what I am especially interested in studying is his signature application of paint.
Here is a picture I took of Wayne Thiebaud's "Girl with a Pink Hat" at the San Francisco Museum of Modern Art. The figure is expertly rendered, presented in a "buffet" of fully saturated, unexpected color. Consistent for Thiebaud is the application of thick and creamy paint that we can see in this piece. If we look closely, we can see how Thiebaud drags his brush with white paint right along the outer edges of the figure, then carries those strokes outside horizontally to the edges of the canvas. I admire this discipline paired with creativity,

 “I think an artist’s capacity to handle the figure is a great test of his abilities,”  said Thiebaud. In "DELICIOUS, The Life and Art of Wayne Thiebaud, author Susan Goldman Rubin responds to this quote, saying, 
   "That’s true. And an artist’s capacity to paint row upon row of cakes and pies is a great test of his sanity. This man must be crazy sane."

I begin the technical study with a 6"x 8" canvas panel loosely replicating a cropped area of "Girl with a Pink Hat". I do a quick freehand sketch directly on the panel laying out basic shapes.

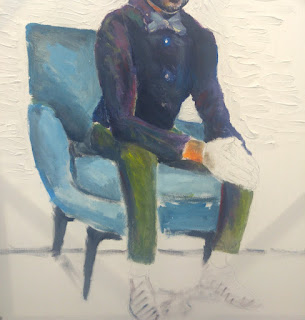
I start adding more color using Thiebaud as a guide. I try to replicate the color in his cool and warm shadows, while also making some of Thiebaud's so-called "arty strokes".

To achieve a look of thick paint, I first try a dollop of white paint poured directly onto the panel. From here I will drag the brush along the outer edges of the figure, then outside to the edges in horizontal strokes. 

After the white paint has dried, I realize that this approach may not work best. The paint thinned out a lot more and cracks began to form in the paint.

Next, I tried applying Dick Blick's Acrylic Gel Medium thickly to the panel. I laid down the gel with the same strokes used previously. Once it dried, I was happy to see that it had not chipped the paint or lost its thickness. I can duplicate this process with gel medium and white paint to achieve a much thicker, textural look for the empty spaces surrounding the figures in my own series.

I am already applying what I learned from my technical study. I will work with more gel medium (Dick Blick brand specifically, the best I've used so far at $18 a quart) and modeling paste, another medium I have just started using. The gel medium dries on completely transparent and helps saturate color, It dries exactly as it is applied to the canvas - there is no dripping or thinning. This allows for thick applications that may be a little hard to control. I will work on refining my strokes with the gel around and outside the figure according to Thiebaud's approach in "Girl with the Pink Hat",  I will experiment with modeling paste a bit as well, which dries on completely opaque unlike the gel medium I use.

It is my hope that this improved thickness of paint outside the figure will add textural interest to an otherwise static white background. Additionally, I want my subjects to be looked at, One good way to ensure that viewers will actually give the figures the attention they deserve is to treat the entirety of the composition with the same reverence.

Monday, September 12, 2016

Series Painting #3: In progress

For this painting, I had to composite two pictures together digitally. I took the face from one photo sent to me and composited it onto the body of another pic of the subject.  I projected the image on canvas and loosely sketch it on with a pencil. Adjustments will be made later.

Using my composited photo as reference, I begin with painting the face as usual. I start out painting loose, keeping in mind some of the dark the darkest points (shadows, core shadows, pupils, etc) and basic shapes. I will continue to add paint and refine from this stage.   

After lots of refinement, I start to get more of a likeness. I now begin paying down color for the body, once again considering darkest points first and highlights last. A black and white plane is laid out under the subject that matches the same height as the other two paintings (8 inches up from the bottom of the canvas). I will further refine this surface in all the paintings so that it matches better. 

This painting is still in progress. I will continue to refine shapes, improve the blending of shadows to highlights, build up white paint around the subject, and add more subjective color. 
UPDATE: Here is the painting as of now, October 25th. I soften the features and increase the likeness. More details are added to the body and thick gel medium and modeling paste is applied to the area surrounding the figure.

Saturday, September 3, 2016

Series Painting #2: In progress

For my second painting in the series, I start with a very rudimentary pencil sketch of the subject to get a basic idea of where features should go.

I start to define the shapes of the face by blocking in some of the darkest tones. Basic highlights are suggested, but they will be refined later. 


The process of layering values over the face begins to really saturate the canvas and thicken the paint. Features of the face get more refined in relation to the source photo. I begin to add more subjective color as well as thick white paint around the subject's head.

I begin to work my way down the previously projected sketch of the body, again referring to my source photo. Basic blocks of color are put down to remind me up important lines in the sketch.
I continue to put down more basic color patterns and begin to saturate the canvas in these areas. The ground is placed beneath him.


I will continue to work on this painting over the weekend and post more updates along the way. :)

*UPDATE*

I went on to add more detail to the figure's pants, shirt, and couch. Thick gel medium is applied around the figure and painted over with white.

More detail is added, as well as more shadow. I apply a thin wash of forest green paint to push back the figure in space. This painting is still not finished, but it is most definitely getting closer.


Wednesday, August 31, 2016

Series Painting #1: In progress

Initial sketch is laid out for the painting on a 30"x40" canvas.

I quickly start laying down color.I work off information provided by the sketch to get the right shapes. Now I refer to the reference photo again to process information about highlights, shadows, and tonal shifts. I tryvro think about the subject-a tattoos as shapes rather than symbols. This way I don't paint what I think I see/ know, only the shapes and lines as they are presented at that moment in the photo.  

More of the painting gets roughed in. I add more shocks of color to emphasize my own style and some of the characteristics I admire about Wayne Thiebaud's technique. I apply modeling paste to the white space around my subject. This will make my applications of white paint appear thicker and creamer. Another layer of acrylic gel medium will further saturate color and thicken paint.

This painting isn't finished yet. I will continue working on this piece As I begin sketches for my next in the series.